Tag: Apple

zitstif-multibootmbr-usb-yumi-2.0.0.9-2017-07-11-19-img (zitUSB)

by on Jul.15, 2017, under Posts, Tools

Today I present to you a very useful tool that I would like to share with you. If you work in information technology or dabble around with it, this tool may be of great use to you. Inspired by http://www.hackfromacave.net/katana/, I have made my own multi-booting USB flash drive. This is not a replacement for Katana but just merely an alternative. I present to you: zitstif-multibootmbr-usb-yumi or zitUSB for short (URL to download is toward the bottom of the post).

This flash drive image not only has multiple distros on it, but has an array of useful tools for any ‘hacker’, computer enthusiast, network admin, technician, etc. Here is the root of the flash drive:

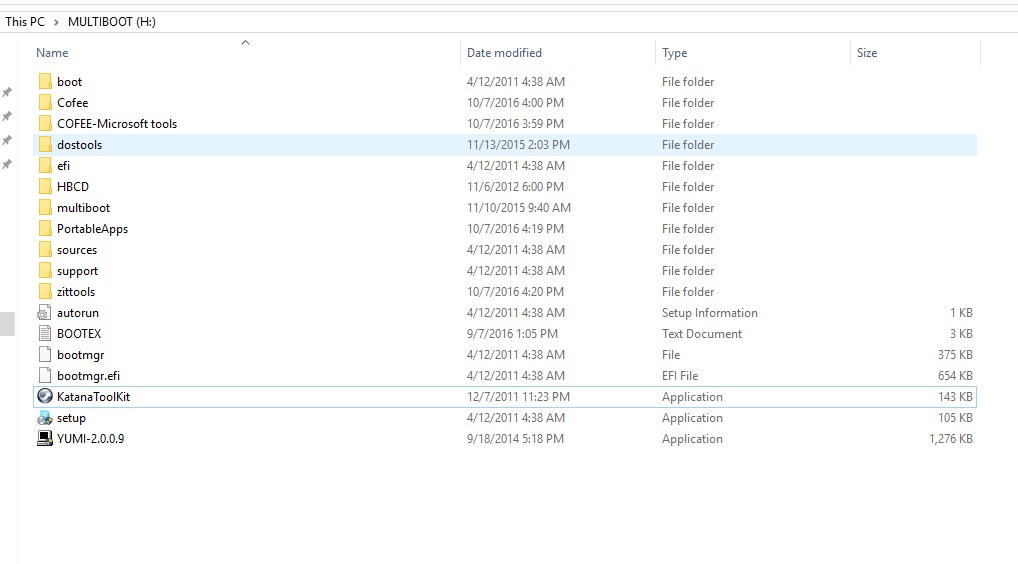
For those of you willing to look at the `tree` of this drive, here you go: http://zitstif.no-ip.org/usb/tree.txt

Here’s a list of the distros/bootable OSes:

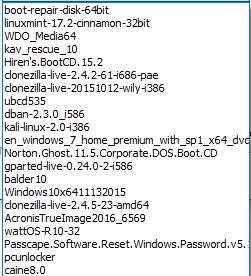
For clarification: WDO is Windows Defender Offline, kav_rescue is kaspersky AV live CD, the Windows 7 Home Premium is basically any version of Windows 7 (via a method like this),  and there’s multiple versions of Clonezilla because I have ran into compatibility issues with certain systems.

TAKE NOTE THAT YUMI-2.0.0.9 IS ON THE ROOT OF THE DRIVE, USE THIS VERSION FOR ADDING OR REMOVING DISTROS! IF YOU USE ANY VERSION DIFFERENT TO ADD OR REMOVE DISTROS, YOU WILL POTENTIALLY MAKE YOUR FLASH DRIVE UNBOOTABLE!

I made an image of my flash drive using clone-zilla-2.4.2-61-i686-pae, however that version or any newer version should work in creating your flash drive.

A quick side note: I was able to boot off of this drive using a Macbook (13-inch, Late 2009). I first had to use Plop and then told the Macbook to boot off of USB. However, in the Yumi menu, the keyboard did not work and I had to use an external keyboard.

Requirements:

  • 1 Flash drive that is 32GB or larger
  • A computer with working USB ports
  • clone-zilla-2.4.2-61-i686-pae or newer and know-how for using clonezilla to restore an image (look here if needed)
    #Update 8/30/2018, I’ve had problems using newer versions of clonezilla restoring this image to flash drives, so far it seems that clone-zilla-2.4.2-61-i686-pae will restore the image without any problems, it can be downloaded here: https://sourceforge.net/projects/clonezilla/files/clonezilla_live_stable/2.4.2-61/
  • patience to download an 18GB file
  • To use: a computer that supports CSM or legacy mode, system must also be x86 or x64, ARM is NOT SUPPORTED

Hashes:

zitstif-multibootmbr-usb-yumi-2.0.0.9-2017-07-11-19-img.rar
MD5: 0988fb81652742a595748ac723c8a787
SHA-1: 8adeb884baeff97a5c09721ae64ff6a5d88a96df

RAR content hashes (MD5):

ffe3d783099ca73716e2b640bfd831e7 blkdev.list

40bab056938e4c10321a605a093b32a6 blkid.list

e78a6e82dfbcd592ec3f3cac3845a734 dev-fs.list

ff0a4ce532aa9be376f4e49bc35fe572 sdd-pt.sf

d9aecb1e6f8b6be75219b313998ec8e0 sdd-chs.sf

890485aa018405d04fadcd3a51d71fd4 sdd-pt.parted

0989aa9d66fe2fbade298f8c6f1236db sdd-pt.parted.compact

ed356b009be474fef10efc60939de511 sdd-hidden-data-after-mbr

e2dbab6ba17e25d3ff12a179da13732e sdd-mbr

f0873661b3057fc74d65acaaf063ac64 sdd1.vfat-ptcl-img.gz.aa

b0bcbb15f49c38e2deaf9087bc2da5b0 sdd1.vfat-ptcl-img.gz.ab

0ebfd956346a0c1c6d72a1d385ef3b7a sdd1.vfat-ptcl-img.gz.ac

009174f7ddcc057f49e9dfc54da58d91 sdd1.vfat-ptcl-img.gz.ad

b303b75755c0815bbdcc69cb09540dfd sdd1.vfat-ptcl-img.gz.ae

7a466b46e75d7f2e58580a937b9fff74 info-lshw.txt

8eab9cdcaa09d256b20084b2e8839e15 info-dmi.txt

bdf55074c4e8720d2fa7c0a3bca7909b info-lspci.txt

4501bf778509426fba474f19fa0d0cf4 info-packages.txt

85396fcb9cb6ae3247dfdf0c34242ae4 parts

b1e4a422a5f04875f35577bf8856d688 disk

db0a67b885cff5a95ec3d745b0b33294 info-saved-by-cmd.txt

c5c44e45b2eed964753fbb6060caba23 clonezilla-img

Download:

File is hosted on Google Drive and MEGA.NZ. The URLs are available in a TXT file: http://zitstif.no-ip.org/usb/url.txt

sha1sum 654fc8f2d47ac3c4b8e31103ef819222f910a87e url.txt

Feel free to leave any feedback.

#10/15/2017 Recently a friend wanted me to make a copy for him. The USB drive I used to create the Clonezilla image, calls for a 32.1GB flash drive, however his flash drive is only 32GB. This is no issue. The zitUSB volume has about 10GB free and you can use the ‘expert’ option in Clonezilla, switch on the -icds flag, and lastly set the option for proportional partitions.

#8/3/2017 Due to limitations of MEGA.NZ, I have the file also hosted on Google Drive.

#7/22/2017 Currently trying to find another hoster outside of MEGA.NZ because MEGA.NZ limits how much you download at a time. (After downloading about 5GB, you have to wait about 5 hours until you can download more or you have to pay for a premium account. I’m currently looking into archive.org but I’m running into issues.) 

Leave a Comment :, , , , , , , , , , , , , , more...

Steps Toward Weaponizing the Android Platform

by on May.11, 2013, under Posts

(4/16/2015) – NOTE: THIS SOLUTION HAS BEEN KIND OF SUPERSEDED BY https://www.kali.org/kali-linux-nethunter/ , if nethunter doesn’t work for you then continue on with this post:

The mobile and tablet market have been flooded by millions upon millions of Android based devices. I wonder if Ken Thompson or Dennis Ritchie would have ever imagined that their invention from nearly 44 years ago would have influenced the likes of the Linux kernel,  Google, Apple, and beyond. We are now in a sea of Unix-like devices that now can easily fit in individuals pockets, which have multiple core processing power and can easily access SCADA systems with a few keystrokes.  It has never been a better time for pocket sized penetration testing devices.

In this article I will be covering ways that one can turn their Android based device into a powerful pocket sized penetration testing tool. If you’re looking to do wireless sniffing or packet injection with your Android based device, this article will be of little help. (If interested please see this, this, this, this, and this.) To do so, one needs a specific Android device that supports OTG, with a custom ROM, and you’ll most likely need an external USB wireless adapter. (Honestly, if you’re looking for a device for cracking WEP keys without any external USB wireless adapters, then I highly still recommend the Nokia N900.)

(NOTE: If you’re strictly looking to do wireless sniffing,  there is AndroidPCAP which I have tested with my Nexus 7 and a RTL8187 based wireless USB adapter.)

Firstly, before progressing on towards the weaponizing of your Android device, please take the time to back up any vital information. Have a look at this.  Reason being, is that you’ll need to root your Android based device. Depending on your device and the method of rooting, rooting your device and unlocking the bootloader can wipe your device.

Setting up Kali Linux ARM Chroot on your rooted Android based device that has about 6GB of free space

1.) Install BusyBox
2.) Install Terminal Emulator
3.) I created a Kali Linux ARM IMG that one can easily mount and it can be downloaded here:
http://goo.gl/qmGle
https://archive.org/details/Kali.nogui.armel.zitstif.chroot.482013

kali.nogui.armel.zitstif.chroot.482013.7z

md5: d60c5a52bcea35834daecb860bd8a5c7
sha1: f62c2633d214de9edad1842c9209f443bcea385d

kali.img

MD5: be61799f8eb2d98ff8874daaf572a1d5
SHA-1: f9c6a820349530350bbb902d17ae6b4a5173937c

NOTE: This image gives you about 2GB of free space in the environment to play with so use with care.

4.) Extract the 7z file and make sure that there’s a folder in this following location: /sdcard/kali
5.) In this folder you should have shell script named ‘kali’ and the ‘kali.img’ image file.
6.) To mount the kali.img file as root do this: sh /sdcard/kali/kali

Optional:
If you want Terminal Emulator to open up and go directly to the chroot environment do as follows:
1.) Open up Terminal Emulator
2.) Go to preferences
3.) Tap on Initial Command
4.) Enter this: su -c “cd /sdcard/kali && sh kali”

Now if you tap on Terminal Emulator, you’ll go directly to your Kali chroot environment. If you want to leave the environment and back to the Android command line, simply type exit.

Optional: If you want to access files from /sdcard/ from your Kali chroot envrionment, one way is to have an Openssh server on your Android device that listens on all interfaces. Then under your chroot envrionment do: mkdir /media/sdcard/ and then connect to your ssh server on your loopback interface to store the ssh key. Then you could use a script like this in your chroot environment (or even edit your .bashrc file to run it automatically):

http://zitstif.no-ip.org/mountsdcard.py #You’ll need to edit the username and password appropriately for your situation.

I should warn you that this Kali image is not setup with the idea of using a window manager or really any GUI tools. In my humble opinion to take advantage of Kali Linux, you don’t need a GUI. Using the terminal to access tools like nmap, netcat, w3af_console, sqlmap, xsser, and metasploit will be sufficient to get one started on their penetration test.

Once you’re in the Kali Linux chroot environment, please do the following:

apt-get update && apt-get upgrade && msfupdate

In addition to setting up the Kali Linux chroot environment, here are a list of other tools and a quick description of each that I recommend you to install:

2X Client – Remote desktop client
AndFTP – ftp/sftp client
androidVNC – vnc viewer client
AndSMB – Android Samba client
AnyTAG NFC Launcher – Automate your phone by scanning NFC tags
APG – OpenGPG for Android
CardTest –  Test your NFC enabled credit cards
Checksum –  basically a GUI tool for md5sum and shasum tools
ConnectBot – powerful ssh client
DNS Lookup – perform DNS and WHOIS lookups
Dolphin Browser – a browser that easily allows you to change your UserAgent
DroidSQLi – automated MySQL injection tool
dSploit – Android Network Penetration Suite
Electronic Pickpocket –  wirelessly read NFC enabled cards
Exif Viewer – shows exif data from photos and can remove this information
Fast notepad – simple but useful notepad application
Find My Router’s Password – title explains it all (mostly for default passwords)
Fing – very similar to Look@LAN tool for Windows
Goomanager –  see link for more information
Hacker’s Keyboard –  Miss the easily accessible CTRL key? This app is for you
HashPass – translate text into hashes
Hex Editor –  a very usable hex editor for Android
inSSIDer – wireless network scanner
intercepter-NG – multi-function network tool, sniffer, cookie intercepter, arp poisoner
IP info Detective – find out all sorts of info on an IP address
IP Webcam – turn your Android device into an IP security camera
Network Signal Info – basically a graphical tool for iwconfig
NFC Reader – used for reading various NFC technologies including some keycards
NFC ReTAG – Re-use/recycle write protected NFC Tags such as hotel key-cards, access badges, etc
NFC TagInfo -another NFC reader
OpenVPN Connect – open vpn client
Orbot – tor on Android
Packet Injection – poorman’s GUI version of scapy
ProxyDroid – use your socks5 proxy with this application
Root Browser – great file manager for Android
Routerpwn – test how secure your router is
SandroProxy – kind of like Webscarab
Secret Letter – a  poorman’s stegonagraphy tool
SSHDroid – openssh server for android
Supersu – manage what programs access root functions
Teamviewer – remotely control Windows, OSX, and Linux based systems
Terminal Emulator – no explanation needed
tPacketCapture – packet sniffer that doesn’t require root
VirusTotal Uploader – test your malicious payloads
Voodoo OTA RootKeeper – maintain root access even after updates
Wifi File Transfer – access files on your phone from a web browser via an http server
WifiFinder – simple wireless scanner
WiGLE Wifi wardriving – wardriving/warwalking application

Of course this is probably not complete, but I believe this is a very good suite of tools to get one started. If you can think of any more tools or if you have any suggestions, please feel free to leave a comment below.

24 Comments :, , , , , , , , , , , , , , , , , , , , , , , , , more...

Weaponizing the Nokia N900 – Part 4.0 – A Three Year Anniversary!

by on Nov.24, 2012, under Posts

Remember that the most valuable antiques are dear old friends.H. Jackson Brown, Jr.

I felt that this was an appropriate quote for my aging Nokia N900. What should I do with this phone? Should I throw it in the “Electronic Wasteland” in China and should I become just another Android user? Hell, I can even run Backtrack 5 on Android now! There are even reports that hackers have been able to get monitor mode and packet injection to work on Android devices!

However, what if I want to run a wide array of Linux based programs locally using my phone’s operating system without depending upon a chroot environment? What if I want a phone/device that has been known to be able to do packet injection, monitor mode, hostmode and not have to sign up for any large corporation’s software market like “Google Play” or Apple’s “App Store” to install software? Maybe I just want to use apt-get to install my programs for Christ’s sake! What if I just want to whip a device out of my pocket that I can quickly run mtr from to troubleshoot a client’s wireless network issues?

It is also nice to have a phone/device that has a physical keyboard versus a touch screen since in my humble opinion, I believe that touchscreen devices are meant for consuming than being productive.

I still believe the best phone for hackers is the Nokia N900 and it is a shame that Nokia decided to go the way of Microsoft. I personally believe that Nokia should have gone the route of an Android/Linux hybrid mobile operating system, but that’s just my opinion. We will have to see how well the Firefox OS or the Sailfish OS take off.

Android is a great mobile operating system but to me it is kind of a bastard version of the Linux operating system. Another problem with the Android platform is the sheer vast amount of different hardware manufactures there are. So by the time independent developers are able to get features like monitor mode working on one phone, chances are there are a dozen of other phones that have been released while the phone that the developers were able to get monitor mode working on will be given hardly much credence to.

Part of the beauty of the Nokia N900 is that it has ‘staying power’. This phone was released over 3 years go to this date. I still receive e-mails asking for support or giving me compliments on my work for the N900 which I appreciate dearly. There still is an active, smart and driven community around the world who develop applications and provide support for this phone, which I am very thankful for.

So what am I to do with this beloved device? A device that can be overclocked to 1.0GHZ, can run the OSX , can run Backtrack 5, do myriad of other tasks and is available for about $200.

Sadly, my Nokia N900 will no longer be used as a phone but as an MP3/Multimedia player that I can use for penetration testing! With about 32GB of internal storage and a MicroSD slot that can be use to extend the storage of the N900 from 32GB to 48GB, DLNA client/server support, a FM Transmitter, and Pandora client support, why would I want to shell out the extra cash for a new MP3 player that most likely won’t be able to run Metasploit locally and an OpenSSH Server?

This is why for the three year anniversary of the Nokia N900, I have written a bash shell script that helps automate weaponizing the Nokia N900 to save myself and I’m hoping many other individuals time for weaponizing the Nokia N900.

Before you download and run the this shell script, please read the following:

Firstly, I am not responsible if this program bricks/damages your N900 (but I can assure you as long as you follow my instructions you SHOULD be safe). For best results make sure you have flashed your N900 firmware to version pr1.3 (also for best results my shell script works BEST on freshly flashed N900s). I was not able to get my shell script to work properly with the pr1.2 firmware.

Plug your wall charger into your N900. Make sure you also have strong signal strength to your wireless network.

Once you have your N900 flashed, please root your N900 and install bash4. Then pull up the terminal on your N900 and as root do this:

ln -s /bin/bash4 /bin/bash

Next download this following script to your N900:

http://zitstif.no-ip.org/weaponizen900.tar

(sha1sum: c3699aea31c8ac91684e89bfdda7901bcc7f042e  weaponzenizen900.tar)

(Source code for main script is publicly viewable here: http://pastebin.com/4UXmAEQx )

Extract it via:

tar -xvf weaponizen900.tar

Then cd into the newly created folder called “n900project” and run as root:

bash weapoinzen900.sh

MAKE SURE TO FOLLOW AND PAY CLOSE ATTENTION TO ALL THE PROMPTS FROM THIS PROGRAM! Installation typically for me took about 2 hours. If your Internet connection drops out for whatever reason, for the most part it is safe to run this program again!

For a list of tools that weaponizen900.sh installs for native use, please see this: http://zitstif.no-ip.org/listweapons.txt. You can also list the installed tools by typing on your N900 ‘listweapons’. It also installs this following kernel: http://talk.maemo.org/showthread.php?t=85665. With this kernel you can do monitor mode, packet injection, and hostmode with the N900. With hostmode on the Nokia N900, you can use an OTG cable and do forensics with your N900 with tools like testdisk!

PLEASE DO NOT USE THE GUI TO UPDATE YOUR N900! Do this at your own risk! TO SAFELY UPDATE YOUR N900 PLEASE USE A SCRIPT I CREATED CALLED “update”. To update programs that have been installed by your package manager run as root:

update modded

To update programs that have been installed by your package manager and programs like Metasploit, SET, Nikto, and etc run as root:

update modded scripts

I hope this script is of great use to anyone who decides to use it. If you have any issues with this program or need any help with this program feel free to contact me via e-mail. I want to thank the Maemo forums for support on this project.

35 Comments :, , , , , , , , , , , , , , , , , , , , , , , , , , , , , , , , , , , , , more...

Passively finding MDNS names (.local)

by on May.16, 2010, under Code, Posts

Just a quicky:

If you’re in a local area network and you’re trying to do some passive information gathering using a sniffer, here is a great way to find .local host names:

tcpdump -i wlan0 -vv 2&>1 | egrep '*.local'

What’s beautiful about this method is you can usually find people’s full names, especially if they’re using Apple devices. Along with that, you’re not probing or alerting the targets.

Also, if you’re not in range of a wifi access point and can barely see the AP, you can use this method while trying to connect (it makes this method a little less passive..), but I’ve discovered Iphone device names via this method.

And now…. back to the books. 🙂

PS: I’m going to set aside time this week to put more effort into ettersploit.

Leave a Comment :, , , , , , , more...

NameThatApple –nta.sh

by on Mar.04, 2010, under Code, Posts

There’s something about Apple computers that I like to pick on. It’s not really the computers per se, it’s mostly the end users who can get on my nerves. Most people who I’ve met that use Apple computers, have little to no knowledge about computers or information technology. Yet, at times, these people tend to get lofty because they use Apple Computers and feel as if they can be be smug towards you since you might not own an over priced PC. (An Apple computer, which I’ll explain).

Now, not all Apple computer users are this way, and I actually have a few friends who are huge computer enthusiasts, whom use Apple computers and are very knowledgeable in the field of information technology. Also, don’t mind if I meander, but if an Apple computer is a ‘computer’ and if you consider it personal to you.. then isn’t it technically a ‘PC’. as in personal computer? 🙂

With that aside, I’m reintroducing a bash shell script that one can use in a LAN to identify Apple computer users. I’ve tested it on Ubuntu and Backtrack and have had great results. As a matter of fact, a while ago I wrote this program, but as times have changed and the output of nmap has changed, I needed to rewrite this shell script.

Features of NameThatApple (nta):
Information discovery — finding the names of Apple computers which 90% of the time have their real name in the title.
Port scanning — this does a limited number of port scans on ports that are usually open on Apple computers
Iphone/Ipod touch jail break test — If port 22 is discovered, a python script relying on pexpect will test to see if the default password for the root account is ‘alpine’.
MAC address discovery — nta will ARP the Apple computer and report back the MAC address.

If you have problems resolving the host names of the Apple comptuers with my program, make sure your Linux distro supports MDNS and/or you may have to try a different version of netcat.

If you have any other problems, please contact me or leave a comment.

Here’s some screen shots of nta.sh in action: (Note: I blurred the end users names out for privacy)

If you want to capture the out put of nta.sh, then pipe the output to ‘tee’, like this:

sudo ./nta.sh | tee newlog.log

Here are the files:

Plain text (main shell script):
http://zitstif.no-ip.org/nta/nta.txt

Plain text (jail break test script):
http://zitstif.no-ip.org/nta/jailbreaktest.txt

Tar file (both files):
http://zitstif.no-ip.org/nta/nta.tar
MD5sum: 0e4672083861d00893afa9d9f0527574

As always, more to come! I’m planning on adding more features to nta.sh, such as having it interface through some means with metasploit.

1 Comment :, , , , , , , , more...

Looking for something?

Use the form below to search the site:

Still not finding what you're looking for? Drop a comment on a post or contact us so we can take care of it!