Category Archives: Posts

NameThatApple –nta.sh

There’s something about Apple computers that I like to pick on. It’s not really the computers per se, it’s mostly the end users who can get on my nerves. Most people who I’ve met that use Apple computers, have little to no knowledge about computers or information technology. Yet, at times, these people tend to get lofty because they use Apple Computers and feel as if they can be be smug towards you since you might not own an over priced PC. (An Apple computer, which I’ll explain).

Now, not all Apple computer users are this way, and I actually have a few friends who are huge computer enthusiasts, whom use Apple computers and are very knowledgeable in the field of information technology. Also, don’t mind if I meander, but if an Apple computer is a ‘computer’ and if you consider it personal to you.. then isn’t it technically a ‘PC’. as in personal computer? 🙂

With that aside, I’m reintroducing a bash shell script that one can use in a LAN to identify Apple computer users. I’ve tested it on Ubuntu and Backtrack and have had great results. As a matter of fact, a while ago I wrote this program, but as times have changed and the output of nmap has changed, I needed to rewrite this shell script.

Features of NameThatApple (nta):
Information discovery — finding the names of Apple computers which 90% of the time have their real name in the title.
Port scanning — this does a limited number of port scans on ports that are usually open on Apple computers
Iphone/Ipod touch jail break test — If port 22 is discovered, a python script relying on pexpect will test to see if the default password for the root account is ‘alpine’.
MAC address discovery — nta will ARP the Apple computer and report back the MAC address.

If you have problems resolving the host names of the Apple comptuers with my program, make sure your Linux distro supports MDNS and/or you may have to try a different version of netcat.

If you have any other problems, please contact me or leave a comment.

Here’s some screen shots of nta.sh in action: (Note: I blurred the end users names out for privacy)

If you want to capture the out put of nta.sh, then pipe the output to ‘tee’, like this:

sudo ./nta.sh | tee newlog.log

Here are the files:

Plain text (main shell script):
http://zitstif.no-ip.org/nta/nta.txt

Plain text (jail break test script):
http://zitstif.no-ip.org/nta/jailbreaktest.txt

Tar file (both files):
http://zitstif.no-ip.org/nta/nta.tar
MD5sum: 0e4672083861d00893afa9d9f0527574

As always, more to come! I’m planning on adding more features to nta.sh, such as having it interface through some means with metasploit.

Protecting end users by black listing domain names

One of the many programs that I use for Windows to help prevent and remove malware is SpyBot S&D.  One of the methods that SpyBot S&D utilizes, is by editing the hosts file, which for Windows is located at (usually):

C:\WINDOWS\system32\drivers\etc\hosts

About a year ago, I was monkeying around with my hosts file and noticed all the entries put by SpyBot S&D. I thought to myself, “What a wonderful idea.” For those of you who aren’t familiar with the hosts file, please take a gander at this:

http://en.wikipedia.org/wiki/Hosts_file

Ergo, I compiled (well I used quite a bit of from the hosts file that was edited under Windows by SpyBot S&D)a list of offending domains that are usually associated with scams, malware, and/or other nefarious things and put it on my website. I felt that end users who use Linux or even Mac OS X could benefit from editing their hosts file in such a way. Here’s the hosts file:

http://zitstif.no-ip.org/THELIST.txt
MD5sum: 7ec6a57b82d53359c3bcff54d0b1cc62

For *nix end users, if you want to append THELIST.txt on the fly over the Internet via bash shell, give this a try and verify your results as root:

printf "GET /THELIST.txt HTTP/1.0\n\r\n" | nc -vv zitstif.no-ip.org 80 2>&1 | egrep -v 'HTTP|Apache|Date:|ETag:|Accept-Ranges:|Content-|Connection:|Modified:|Connection'  >> /etc/hosts

By doing this, you’ll protect your end users by making the blacklisted domain names unavailable to them. This may not be perfect, but this is one of the many ways you can help prevent identity theft for your end users or even yourself.

More to come.

arp-sentinel

Those of us who understand some of the great weaknesses in IPv4, know that under certain circumstances (especially in local area networks), attackers can carry out some pretty devious tasks. Arp-spoofing (http://en.wikipedia.org/wiki/ARP_spoofing) can be used to intercept traffic and even modify it accordingly to the attacker’s will. Programs like arpspoof, cain&abel, and especially ettercap-ng, when abused, can be used for purloining credentials and potentially identities.

With this being true, I decided to write an implementation of a arp-spoofing detection program that is geared toward Ubuntu/Debian. The beauty of this program, is that instead of just creating logs that non-tech savvy users would most likely not glance at, this program alerts the end user via x-message. Granted, this x-message window can potentially get annoying, however this was intended. The end user needs to be alerted of if arp-spoofing is taking place, their information could be potentially at great risk.

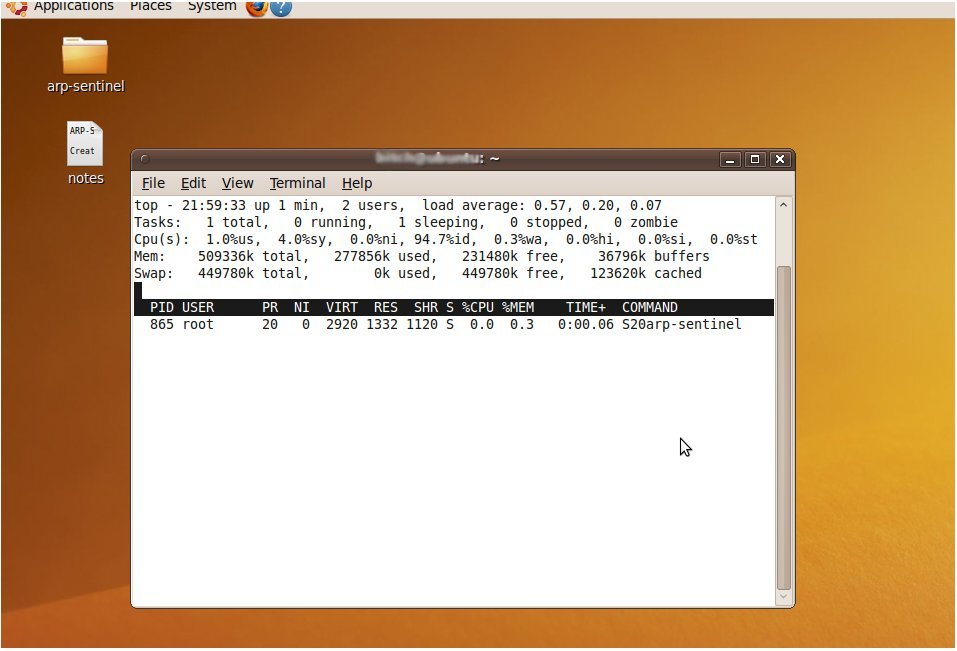
The beauty behind arp-sentinel, is that it uses very low resources and is mainly intended for end users who run Ubuntu on a laptop, who use insecure hotspots for whatever purposes. Here’s a screen shot of ‘top’ being used under Ubuntu 9.10 on a virtual machine:

Nifty eh? Here’s also a screen shot of the warning message that is displayed:

Here’s the program in a tar file:

http://zitstif.no-ip.org/arp-sent/arp-sentinel.tar

MD5sum: 79c54891a7b235bf6a2f5d4c779771c3

Tested to work on Ubuntu 9.10.

Circumventing pay-for-service wifi points

Ever want to access the internet without authenticating at your local college? Have you found yourself accessing wifi points at airports that require you to pay ‘X’ amount of dollars for service? Well my cheap friend, I have a solution for you!

I will for warn you, that this method is a bit slow and it does require *nix on both ends. Also this is for educational purposes only!

Firstly, you need an accessible server that is running ssh on it, along with a nifty program called ‘dns2tcp’. There are some other similar programs like iodine and such that can do this for you, but this walk-through is focused on the usage of dns2tcp. Also, you need a DNS name, which you can freely get via no-ip.com or dyndns.

File:

http://www.hsc.fr/ressources/outils/dns2tcp/index.html.en

Guide:

http://www.wains.be/index.php/2009/04/24/howto-setting-up-dns2tcp/

I followed this guide quite closely, and it actually did not end up working for me. The guide suggests to start the daemon via:

sudo /etc/init.d/dns2tcpd start

However, this did not work for me. By using netstat, I found that dns2tcpd was not even listening. Instead, I ended up using ‘/usr/local/bin/dns2tcpd’. But before I continue, I’ll post my dns2tcpd config file:

listen = 0.0.0.0
port = 53
# If you change this value, also change the USER variable in /etc/default/dns2tcpd
user = nobody
chroot = /tmp
domain = yourdomain.org
ressources = ssh:127.0.0.1:22

Change accordingly, and yes, ‘ressources’ is suppose to be misspelled.

Here is the command that has worked for me and I’m currently using to make this post possible:

sudo nohup dns2tcpd -f /etc/dns2tcpd.conf &

Verify that you’ve forwarded a port on your router to port 53 on your server, or if your server is in the DMZ, you shouldn’t have to worry about doing this.

Now, in a remote location that has restricted access (via redirecting every HTTP request to a login page), test that you’re server is visible via DNS by using a command like ‘host’. We’ll use my DNS name for this example:

host zitstif.no-ip.org
zitstif.no-ip.org has address 75.41.5.12

If this works, there’s a good chance you’re in business. Then, the next test you want to do is:

dns2tcpc -z zitstif.no-ip.org 75.41.5.12
Available connection(s) :
        ssh

If you see results like this, then chances are, this will work. Next, we need to do some DNS tunneling:

dns2tcpc zitstif.no-ip.org 75.41.5.12 -l 4444 -r ssh

If dns2tcpc is listening on port 4444, you now should be able to ssh into it and this will redirect you to your home server.

ssh -D 1234 user@localhost -p 4444

Once you’ve authenticated then you’re set to now setup firefox or a browser that supports SOCKS 4/5, to connect to your loopback interface on port 1234.

One big reason why I made mention of this, is because Hak5 had an episode showing how to do basically the same thing but they stated you had to pay for your own DNS service / name. My method works, and it’s also cheaper.