Category Archives: Posts

Openssh on Windows + free domain name setup + ssh tunneling

I’m actually posting this for a friend per request:

==OpenSSH + Cygwin Installation==

Over the past year or so, when using Windows on a certain computer in my network, I decided that I wanted secure command line oriented access to my Windows computer. With this being said, telnet would have not been a viable solution to the problem, along with remote desktop. Knowing about cygwin, I was soon to perform some searches on google pertaining to the installation of OpenSSH via cygwin.

The web site presented below, is a wonderful resource for this situation:

http://pigtail.net/LRP/printsrv/cygwin-sshd.html

Follow this tutorial closely and you should have little to no problems getting openssh set up on a Windows computer.

Also if you’re planning on doing ssh tunneling from a remote location or logging into your computer remotely via ssh, make sure to forward port 22 (or whatever port you set ssh to listen on) to the Windows computer that is hosting SSH. You may also want to set the Windows computer as a static client on your network, so you don’t have to worry about the LAN IP address changing which could cause problems, but depending on your router, this isn’t always necessary. It seems that a lot of routers do ‘static DHCP leasing’. To make sure that the service is remotely accessible, go to www.nmap-online.com .

Click on ‘Custom scan’.

Then under the ‘Nmap options..’, clear the options they have set there for you by default, leave your IP address alone and put:

-P0 -sV -vv -n -T3 -p 22 (YOURIP)

Lastly, click on ‘I agree with the Terms of Service’ and click ‘Scan Now!’. If nmap-online’s results yield the port is open, then you’re in business! Otherwise, you most likely
have your software firewall blocking openssh or you didn’t set up port forwarding on your router correctly. Other causes could include your ISP blocking that port as well.

=========================

==Dynamic DNS the free way==

One solution for a free DNS name is to use www.no-ip.com. Sign up using your e-mail address and here’s a video with a kid who has an annoying voice that may help you:

If you have set this up correctly, you should be able to resolve your new DNS name from the command line using a tool like ‘nslookup’. The IP address that shows up for your new DNS name, should be your WAN IP.

=========================

==SSH tunneling via Putty==

Now, say if you want to have a sense of security in a remote location that may be a malicious network. One (not perfect) good solution for if you’re a Windows user is to do SSH tunnelling.

http://oldsite.precedence.co.uk/nc/putty.html

Once you have logged into your server and set up a dynamic port on your loop back interface (127.0.0.1), it is now time to configure your browser to use a SOCKS 5 proxy connection on your loop back interface. Under Firefox this looks like this:
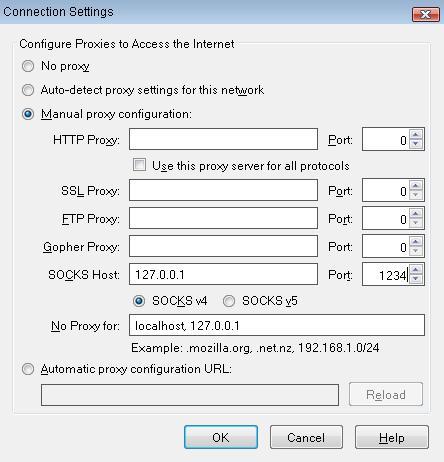
To verify that you’re actually tunneling home, go to www.ipchicken.com and here you should see your Dynamic DNS’s IP address. Now, you don’t have to worry nearly as much about MITM attacks and sniffing. Web  pages won’t appear nearly as quickly, but as the old saying goes, ‘Better safe than sorry’.  I hope this helps you dear friend of mine! 🙂

Last but not least, if you want to see a video on SSH dynamic port forwarding / tunneling, Irongeek has a wonderful video (bare in mind you don’t necessarily need ‘keys’, that he speaks of, you can use password authentication instead):

http://www.irongeek.com/videos/sshdynamicportforwarding.swf

repository.maemo.org update

Feb 13, 2010: UPDATE!:

In regards to this post: http://zitstif.no-ip.org/?p=56

Now, it is unnecessary to edit your hosts file to mend the respository.maemo.org resolution issue.

host repository.maemo.org
repository.maemo.org is an alias for repository.maemo.org.edgesuite.net.
repository.maemo.org.edgesuite.net is an alias for a515.g.akamai.net.
a515.g.akamai.net has address 198.63.194.139
a515.g.akamai.net has address 198.63.194.161

Installing Backtrack 4 (after Windows XP and Ubuntu) + MORE

Now, I don’t mind booting off of a flash drive that has BackTrack installed on it via unetbootin , but having the ability to triple boot between 3 operating systems via grub was just too tempting.

Keep in mind that most guides suggest to install Windows XP, then Backtrack and finally Ubuntu. This is the simple way and a lot less hassle, but my guide is geared towards individuals like myself who’ve installed Windows and Ubuntu and then, finally decided they wanted to install BackTrack.

The first task that I needed to do was, to make an empty partition on my laptop’s hard drive. I decided to shrink my Windows XP partition even more via a wonderful too called: Easeus Partition manager.

http://www.partition-tool.com/download.htm

I shrank down my Windows XP partition so I would have an empty partition of about 17 gigs for BackTrack 4.

Doing this, changed my partition numbers under Ubuntu, so I had to change my partition number for Ubuntu under menu.lst. Without doing this, grub loader could not find the necessary files to boot Ubuntu. (If you’re wondering how I did this, you can change boot settings on the fly with grub, by invoking ‘e’ at the boot menu.)

I then followed this guide pretty closely:
http://forums.remote-exploit.org/bt4beta-howtos/20205-dual-tri-boot-grub.html

Here is the text-only cached version from google:
http://74.125.95.132/search?q=cache:http://forums.remote-exploit.org/bt4beta-howtos/20205-dual-tri-boot-grub.html&hl=en&strip=1

(Hopefully this link works, because recently I’ve noticed that the remote-exploit forums have been inaccessible.)

This guide got me to the point where, I had everything copied over that was necessary for BackTrack 4 to run. However, the suggested method for modifying my menu.lst for BackTrack 4 was not quite what I expected.

For BackTrack 4 to boot for me from the grub boot loader, I had to make my menu.lst entry look like this:

title           Backtrack 4 Final
root            (hd0,4)
kernel          /boot/vmlinuz-2.6.30.9 rw root=/dev/hda5
initrd          /boot/initrd.img-2.6.30.9
boot

Now, your hd location will most likely be different, but the point I’m trying to make here, is that the kernel and initrd settings are completely different from what the guide suggested in the forum.

After making these changes, I was able to get into BackTrack 4, but there were more problems to come!

==========================================================

I own a Gateway MT3707, which for it’s WLAN card, it has a Realtek RTL8185 wifi card. I haven’t had much luck with getting it to work with the Linux drivers in the past, so I’ve resorted to ndiswrapper.

BackTrack did have some drivers for my wifi card, but they didn’t work what so ever. So, I did give ndiswrapper a try but it did not work.

This is what worked for me:

Firstly, edit /etc/modprobe.d/blacklist and add: blacklist r8187, blacklist r8180 and blacklist ndiswrapper .

Secondly, with an ethernet cable attached to my laptop, I downloaded the drivers from Realtek, which are for Linux.

http://www.realtek.com.tw/downloads/downloadsview.aspx?langid=1&pnid=1&pfid=1&level=6&conn=5&downtypeid=3&getdown=false&downloads=true

Again, in the past these drivers haven’t worked for me, but Realtek was kind enough to update them.

After following the directions and rebooting, I thought I was on my way to getting on my wireless network. Lo and behold, ..no this wasn’t true.

By doing:

iwlist wlan0 scan

I was getting a weird permissions error, which was odd because I was root. So, just for the fun of it I tried using dhclient.

dhclient wlan0

I then, received NO DHCP Leases (basically I couldn’t get an IP address). Using iwlist again just for a last resort, I did get results and no errors (which was quite weird).

After setting my essid via iwconfig, I was finally able to get onto my network!

At a later time, I booted back into BackTrack 4 and tried getting back on to my network. Yet again, I was getting the same permissions error when I used iwlist and then it would lead to no results. The only odd way to mend this was to run dhclient first and then use iwlist to look for wifi networks.

To make a weird fix for this, I added this file to /etc/init.d/ :

(Name fixme)

#!/bin/bash

dhclient wlan0 &> /dev/null &
sleep 3.5;
kill $(ps -A | grep dhclient | awk '{print $1}' | head -n1);
exit 0;

Make this file executable by using chmod and then use sysv-rc-conf (or chkconfig if you want) to make sure that it runs at the following levels (which worked for me): 2, 3, 4, 5 and S.

This will run dhclient in the erroneous way for you and then kill it, that way you’ll be able to use iwlist to view your networks. I honestly think this has the affect of the ‘pump’ command.

Lastly, I should note, that for my wifi card to work in BackTrack 4, I can’t reboot from another operating system into BackTrack 4 and have it work. I have to totally power off my laptop and then boot into BackTrack 4 and then my wifi card will work. This was kind of a pain. I hope this helps some one.

More to come.